Disable third-party firewall software
Firewalls act as locked gates that block intruders from accessing your computer and permit the passage of desirable applications. Sometimes you may need to disable a firewall in order to allow certain programs access. From the list below, select the firewall you would like to disable on your computer:
- ZoneAlarm
- Norton Internet Security 2009
- Norton Internet Security or Norton Personal Firewall
- Windows 7 and 8 Firewall
- Windows Vista Firewall
- Windows XP SP 2 Firewall
- Windows XP SP 1 Internet Connection Firewall (ICF)
ZoneAlarm
There are two ways to disable the ZoneAlarm firewall.
Using the Windows taskbar
1. On the Windows taskbar, next to the clock, right-click the ZoneAlarm icon, and then click Shutdown ZoneAlarm.
![]()
Note: If you don't see the icon next to the clock, click the arrow next to the clock to reveal the hidden icons.
2. Click Yes.
Using the Programs menu
1. Click Start, select All Programs or Programs, select ZoneAlarm, and then click ZoneAlarm Security.

Note: If you are using Windows 8, move your mouse to the top right of your desktop and then click on Start. Type Z to locate ZoneAlarm in your programs.
2. In the left pane, click Firewall.
3. In the Internet Zone Security section, move the slider to Off.
Notes: To enable the firewall, repeat steps 1 to 3.
- In the Internet Zone Security section, move the slider to High.
- In the Trusted Zone Security section, move the slider to High.
4. Close the ZoneAlarm window.
5. If prompted, click OK.
Norton Internet Security 2009
You can use either of the following ways to disable Norton™ Internet Security 2009.
Using the Windows taskbar
1. On the Windows taskbar, next to the clock, right-click the Norton icon, and then click Disable Smart Firewall.
Note: If you don't see the icon next to the clock, click the arrow next to the clock to reveal the hidden icons.
2. Click the Select the duration drop-down menu, and then click Until system restart.
3. Click OK.
Using the Programs menu
1. Click Start, select All Programs or Programs, select Norton Internet Security, and then click Norton Internet Security.
Note: If you are using Windows 8, move your mouse to the top right of your desktop and then click on Start. Type Z to locate ZoneAlarm in your programs.
2. In the Internet section, click On next to Smart Firewall.
3. Click the Select the duration drop-down menu, and then click Until system restart.
4. Click OK.
Norton Internet Security or Norton Personal Firewall
1. Start Norton Personal Firewall.
2. In the left pane, click Status & Settings.
3. Click Security.
4. Click Turn off.
Windows 7 and 8 Firewall
1. Click Start, and then click Control Panel.
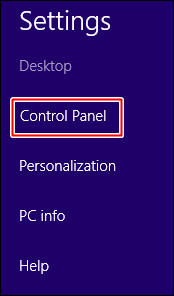
Note: If you are using Windows 8, you can find the Control Panel by moving the mouse pointer to the top right of the Desktop screen and then clicking on Settings.

2. Click System and Security.
Note: If the View by is set to either Large icons or Small icons, click Windows Firewall, and then skip to step 4.
3. Click Check firewall status.
4. In the left panel, under Control Panel Home, click Turn Windows Firewall on or off.
5. Under Customize settings for each type of network, in the Home or network (private) network location settings section, select the Turn off Windows Firewall (not recommended) option.
6. Under Customize settings for each type of network, in the Public network location settings section, select the Turn off Windows Firewall (not recommended) option.
7. Click OK.
8. Close all open windows.
Note: To reactivate the Windows 7 Firewall, repeat steps 1 to 4. Under Customize settings for each type of network, select both the Turn on Windows Firewall options, and then click OK.
Windows Vista Firewall
1. Click Start, and then click Control Panel.
2. Click Security.
Note: If the Control Panel window is set to Classic View, double-click Windows Firewall.
3. Click Turn Windows Firewall on or off.
4. If you are prompted for an administrator password or permission, type the appropriate password or click Continue to confirm.
5. On the General tab, select the Off (not recommended) option, and then click OK.
6. Close all windows that were opened during the above procedure.
Note: To reactivate the Windows Vista Firewall, repeat steps 1 to 4. On the General tab, select the On (recommended) option, and then click OK.
Windows XP SP 2 Firewall
1. Click Start, and then click Control Panel.
2. Click Security Center.

3. Click Windows Firewall.
4. On the General tab, select the Off (not recommended) option, and then click OK.
5. Close the Windows Security Center window.
6. Close the Control Panel window.
Note: To reactivate the Windows XP SP 2 Firewall, repeat steps 1 to 3. On the General tab, select the On (recommended) option, and then click OK.
Windows XP SP 1 Internet Connection Firewall (ICF)
1. Click Start, and then click Control Panel.
2. Double-click Network and Internet Connections.

3. Double-click Network Connections.

4. Click the desired Local Area Connection once to highlight it, and then click Change settings of this connection.

5. Click the Advanced tab.

6. Under Internet Connection Firewall, clear the check box next to Protect my computer and network by limiting or preventing access to this computer from the Internet, and then click OK.

7. Close the Network Connections window.
Note: If you wish to restart the Windows XP Firewall, repeat steps 1 to 5. Under Internet Connection Firewall, select the check box next to Protect my computer and network by limiting or preventing access to this computer from the Internet, and then click OK.
You’re done! Your third-party firewall is disabled.